
When it comes to understanding your computer’s performance, knowing your CPU details is essential. The CPU, or Central Processing Unit, is the brain of your computer, dictating how efficiently your device can perform tasks. If you’re unsure about the specifications of your Windows 11 computer, particularly your CPU, you may be wondering how to know what CPU my Windows 11 computer has. The good news is that there are several straightforward ways to find out. In this guide, we’ll explore multiple methods to help you discover the processor type and specifications of your Windows 11 machine. Whether you’re a casual user, an aspiring tech enthusiast, or someone looking to upgrade your system, knowing your CPU is the first step in understanding your computer’s capabilities.
Understanding the technical aspects of your CPU can also empower you to make better decisions regarding software compatibility and system upgrades. Knowing your CPU’s details can aid in troubleshooting performance issues, ensuring that you are well-prepared to address any challenges that may arise. This guide will provide you with a comprehensive look at the various ways to uncover information about your CPU, using both built-in Windows tools and third-party applications. Let’s delve into why this knowledge is important and how you can easily access it.
Before diving into the methods, it’s important to understand why knowing your CPU specifications is crucial:
- Performance: Your CPU influences how fast your computer can run programs and handle multiple tasks at once. A powerful CPU can significantly enhance your computing experience, especially when running resource-intensive applications or games. Understanding your CPU’s capabilities can help you manage your system’s performance more effectively and make informed decisions about software installations that will run smoothly on your machine.
- Compatibility: When upgrading hardware or installing software, knowing your CPU ensures compatibility. Certain software programs may have specific CPU requirements, and being aware of your processor’s specifications can prevent compatibility issues that might arise. Additionally, when considering hardware upgrades, such as adding more RAM or installing a new graphics card, knowing your CPU’s capacity will help you ensure that your system can handle the changes.
- Troubleshooting: Identifying your CPU can help troubleshoot performance issues or when seeking technical support. If your computer is experiencing slowdowns or crashes, knowing your CPU specifications can assist technicians in diagnosing the problem more quickly. Moreover, understanding your CPU’s details can help you perform basic troubleshooting on your own, saving time and potentially avoiding costly repairs.
- Resale Value: If you plan to sell your computer, potential buyers will want to know the CPU specifications. A well-informed seller can provide detailed information about the system, which can enhance its appeal to prospective buyers. Knowing your CPU specs allows you to accurately advertise your machine’s capabilities, potentially increasing its resale value.
Now, let’s explore how to check your CPU on Windows 11.
Using the Settings App
The Settings app is a user-friendly way to find out what processor you have. Here’s how you do it:
- Open Settings: Click on the Start menu and select the gear icon to open Settings. Alternatively, you can press Windows + I on your keyboard. The Settings app is designed to be intuitive and accessible, making it an excellent starting point for users of all experience levels.
- Go to System: In the Settings window, click on the “System” category. This section contains various options and tools related to your system’s overall functionality, including display settings, storage, and device information.
- Access About Section: Scroll down and select “About” from the left sidebar. The “About” section provides a concise overview of your device’s specifications, offering essential information at a glance.
- Check Device Specifications: Under the “Device specifications” section, you will see details about your processor, such as its name and speed. This method provides a quick overview of your CPU without requiring advanced technical skills. It’s ideal for users who need to check their CPU information quickly and easily without diving into more complex tools.
Using the Task Manager
The Task Manager offers a more detailed look at your CPU’s performance. Follow these steps:
- Open Task Manager: Right-click on the taskbar and select “Task Manager.” Alternatively, press Ctrl + Shift + Esc on your keyboard. Task Manager is a powerful tool that provides real-time insights into your system’s performance, making it invaluable for both everyday users and IT professionals.
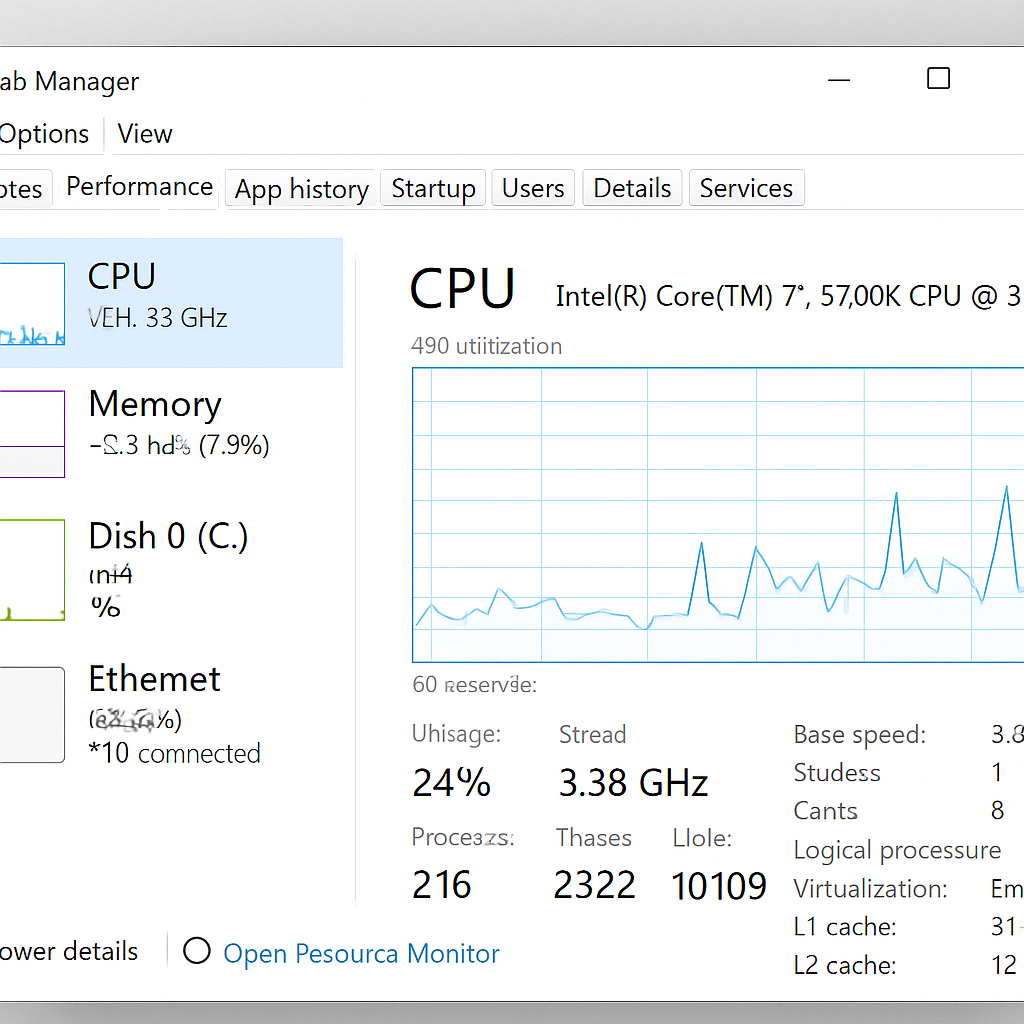
- Go to Performance Tab: Click on the “Performance” tab at the top. This tab provides a visual representation of your CPU’s performance, allowing you to monitor its usage and efficiency in real-time.
- View CPU Details: Select “CPU” from the left sidebar. Here, you’ll see the processor name, number of cores, and current usage. This information is crucial for diagnosing performance issues, as it shows how your CPU is handling current tasks and whether it’s being overworked.
The Task Manager not only tells you what CPU you have but also shows real-time performance, which can be useful for diagnosing issues. Additionally, it allows you to monitor other critical system resources, such as memory and disk usage, providing a comprehensive overview of your system’s performance.
Using System Information
For more comprehensive system details, use the System Information tool:
- Open System Information: Press Windows + R to open the Run dialog, type msinfo32, and press Enter. This tool offers a detailed view of your system’s hardware and software configuration, making it an excellent resource for advanced users.
- View Processor Information: In the System Information window, ensure “System Summary” is highlighted on the left. Look for “Processor” in the right pane, where you’ll find detailed CPU information. This includes not only the CPU’s name and speed but also other technical details that might be relevant for specific tasks or upgrades.
This tool provides an extensive overview of your system’s hardware and software configuration. It’s particularly useful for users who need a more detailed understanding of their system’s architecture, allowing for precise troubleshooting and informed decision-making regarding upgrades and repairs.
Using Command Prompt
For those comfortable with command-line interfaces, the Command Prompt offers a quick way to check your CPU:
- Open Command Prompt: Type “cmd” in the Windows search bar and select “Command Prompt.” The Command Prompt is a versatile tool that allows you to execute a wide range of commands to manage and troubleshoot your system.
- Enter Command: Type wmic cpu get name and press Enter. This command queries the Windows Management Instrumentation (WMI) to retrieve details about your CPU.
- View CPU Name: The Command Prompt will display your CPU’s name. This method is fast and efficient, especially if you’re already familiar with command-line operations. It provides a straightforward way to obtain CPU information without navigating through multiple menus or windows.
Using Third-Party Software
Several third-party applications provide detailed hardware information, including CPU specifications. These tools often offer more in-depth analysis and additional features that go beyond what the built-in Windows tools can provide.
CPU-Z
CPU-Z is a free tool that gives an in-depth look at your CPU and other hardware components:
- Download and Install CPU-Z: Visit the official CPU-Z website and download the software. CPU-Z is known for its comprehensive analysis capabilities, making it a popular choice among tech enthusiasts and professionals.
- Run CPU-Z: Launch the application after installation. The user interface is straightforward, presenting detailed information about your system’s CPU, memory, and motherboard.
- View CPU Tab: The “CPU” tab will display all the necessary information about your processor, including its name, code name, package, and more. This tool is particularly useful for users who require detailed technical information about their hardware.
Read more: free advance system cleaner for desktop
Speccy
Speccy is another popular system information tool:
- Download Speccy: Head to the Speccy website and download the installer. Speccy is developed by Piriform, the creators of CCleaner, and is renowned for its ease of use and detailed reporting.
- Install and Run Speccy: Follow the installation instructions and open the application. Speccy’s clean interface provides an overview of your system’s hardware, with easy-to-navigate tabs for each component.
- Check CPU Information: Under the “CPU” section, you’ll find detailed information about your processor. Speccy not only provides CPU details but also offers insights into other hardware components, making it a comprehensive tool for system analysis.

These tools are user-friendly and ideal for users who want more than just basic CPU information. They offer enhanced functionality and detailed reports that can assist with troubleshooting, upgrades, and system optimization.
Conclusion
Knowing what CPU your Windows 11 computer has is important for managing performance, troubleshooting, and making informed decisions about upgrades or software installations. Whether you use built-in Windows tools or third-party applications, these methods are straightforward and accessible to users of all skill levels.
By understanding your CPU specifications, you can better appreciate your computer’s capabilities and limitations, ensuring you maximize its potential. Whether you’re a casual user or a tech enthusiast, having this knowledge is invaluable. It allows you to optimize your system’s performance, troubleshoot issues effectively, and make informed decisions regarding software and hardware upgrades.
Now that you know how to find your CPU information, take a moment to explore what else your computer can do. Understanding your system’s specifications is the first step in optimizing its performance and longevity. Happy computing! As you become more familiar with your system’s capabilities, you’ll be better equipped to make the most of your computing experience and tackle any challenges that arise with confidence.